Managing Data Tables
In This Topic...
A variety of workflow components can be used to search for data within custom tables. Data Tables are used to manage large amounts of data with optional settings for language and effective periods, allowing lookups to retrieve specific versions of the data.
The data table configuration sets the parameters of the data. Excel files containing the data are then uploaded to Instances of the table, with the specific settings to define when that data should be used. For additional information, see the Managing Data Table Instances section.
The data table configuration can be updated when necessary. For additional information, see the Editing a Data Table Configuration section.
Note: These instructions are for the Data Tables management section within the Workflow Containers. For details on the legacy version of the feature, please refer to the documentation for version 2.5.112 or earlier.
- Open the appropriate Workflow Container. For instructions on finding and opening a container, see the section on Managing Workflow Containers.
- In the Workflow Container Menu widget, open the Lookups group and select Data Tables. The Data Tables page opens with a list of all available data tables within the current container and any shared containers.
- Select an action.
- On viewing or creating a data table, the DataTable Management page opens.
- The panels and fields are described below. Fields marked with a red asterisk * are required.
- Select an action.
Tip: By default, only Active data tables are displayed. Clear the filter in the Status column to view all tables.
If there are a large number of available data tables, see
|
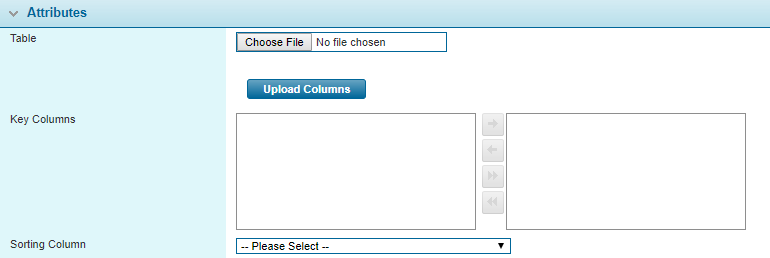
This field is used to upload a sample Excel file to define the columns. Click the button in the field to open a standard file browser window. Locate and select the appropriate file, and the file name and path appear in the field. |
|
|
Only the first row of the first sheet is imported, with all other data ignored. Any unnamed columns appearing before the last named column will be imported and generic column names will be assigned. |
|
|
Example:
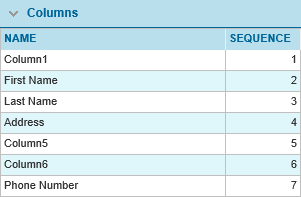
Importing the above sheet would create the following columns:
|
|
|
Click Upload Columns to import the selected Table file. The columns defined in the file will populate the Key Columns field, Sorting Column list, and the Columns grid below. |
|
|
Select which columns will serve as key columns. All key columns must be required data, and a combination of all key columns must uniquely identify individual entries in the table. This field becomes read-only once the table is saved. |
|
|
A column can be selected to serve as sorting or sequence values. The selected column will not be available for use as a Primary Display Column or Key Column in a Data Source Configuration. |
The Columns grid displays all columns included in the table, and the sequence as they appear in the source file.
The Data Table Instances panel becomes available once the current data table configuration has been saved.
This panel lists all instances included in the current data table, and is used to manage the instances. See the Managing Data Table Instances section for detailed instructions.
The Status panel becomes available once the current data table configuration has been saved.
Managing Data Table Instances
The Data Table configuration contains general settings for the data table, while the Data Table Instances, also referred to as Domain / Rate Tables, contain the actual data. Each instance is defined with settings to determine which instance should be used when the data table is accessed, which can provide entirely different data based on those settings.
- Open the appropriate Workflow Container and Data Table configuration. For instructions, see the sections on Managing Workflow Containers and Data Tables.
- In the Data Table configuration, go to the Data Table Instances panel. This panel lists all instances within the current data table.
- Select an action.
- Click a link in the Data Table Instance Name column to view an existing instance.
- Click a link in the File Name column to view the original uploaded Excel file.
- Click a link in the Download column to download the data from that instance into a new Excel file.
- Click Add to add a new instance.
- Check the boxes for one or more instances and click Delete to remove the selected instances and all associated data.
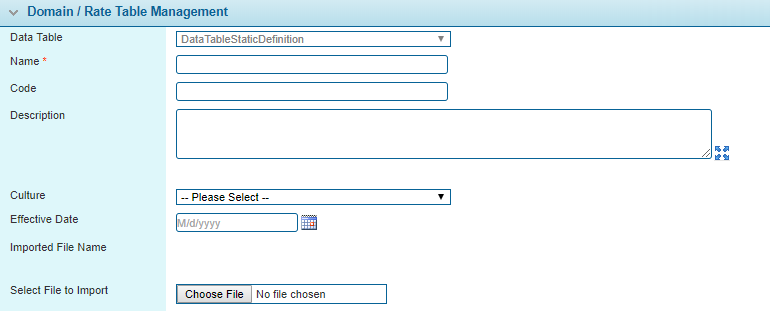
- On viewing or creating an instance, the Domain / Rate Table Management window opens.
-
The panels and fields are described below. Fields marked with a red asterisk * are required.
Note:
Culture and Effective Date are used to define which instance will be used when the data table is accessed.
- Instances are only valid on or after their effective date. The system will identify all instances valid on the specified date.
- Of the valid tables, the system will then check Culture settings for an exact match on both language and region. If no match is found, the system will then check for a match on just language. If no match on language alone is found, the system will then check for instances where no Culture is selected.
- If multiple instances are valid on both Effective Date and Culture, the system will use the one most recently uploaded.
- If no valid instances are found, the system will not return any result.
The columns and column labels in the uploaded file must match the sample file uploaded to the selected Data Table. If not, the file upload will be rejected and an error will be displayed.
The Status panel becomes available once the current data table instance has been saved.
- Select an action.
Editing a Data Table Configuration
The Data Table configuration can be updated when necessary. This includes the re-naming of the table, uploading a new column configuration, or updating the Key Columns or Sorting Column. Note that existing Data Table Instances must be deleted before changes are made to core table properties.
- Open the appropriate Workflow Container. For instructions on finding and opening a container, see the section on Managing Workflow Containers.
- In the Workflow Container Menu widget, open the Lookups group and select Data Tables. The Data Tables page opens with a list of all available data tables within the current container and any shared containers.
-
Click the link in the Name column to view and edit an existing data table. The Data Table Management page opens. See the section on Managing Data Tables for a detailed description of the fields.
-
Navigate to the Attributes panel and apply the necessary changes to the table configuration. The following changes are supported.
- Making changes to the Name or Description fields.
- Uploading a new column structure. This includes adding or deleting columns, changing column names, or re-ordering existing columns.
- Marking the Data Table as Inactive by unchecking the Active checkbox in the Status panel. Inactive tables will still be functional in existing configurations, but cannot be selected for new configurations.
Note: When adding or deleting columns, changing column names, re-ordering existing columns, or modifying Key Columns, existing Data Table Instances structured with the previous table configuration must be deleted. To mitigate any potential loss of data, Data Table Instances can be downloaded prior to updating the table columns.
Before accepting a new table configuration, the system verifies whether any altered columns are used in an active Data Source configuration. If a dependency is identified, the system returns an error message and prevents the upload. The Data Source configuration must be modified before the columns can be successfully uploaded.
Tip: By default, only Active data tables are displayed. Clear the filter in the Status column to view all tables.


 . When the data table is accessed, the system will use the most recently uploaded table that corresponds to a specific date.